How to Install ESP32 on Arduino IDE: A Complete Guide with Troubleshooting
The ESP32 is a powerful, low-cost, Wi-Fi and Bluetooth-enabled microcontroller that has become a favorite among IoT developers. Using it with the familiar Arduino IDE (Integrated Development Environment) combines simplicity with power. While the installation process is straightforward, network issues or configuration problems can sometimes get in the way.
This guide will walk you through the standard installation process for Arduino IDE 2025 and provide detailed solutions for common errors you might encounter.
Prerequisites
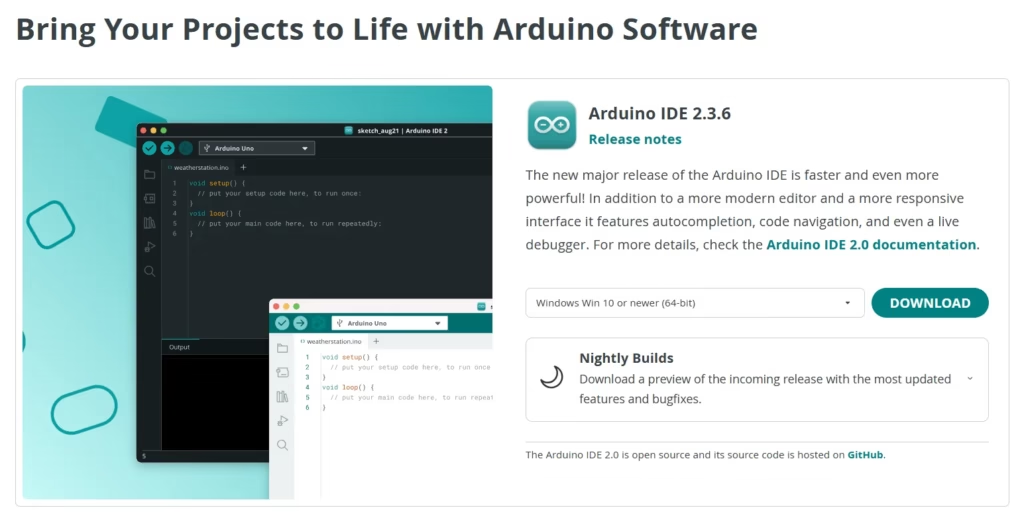
Arduino IDE Installed: Download and install the latest version from the official Arduino website. This guide assumes you are using version 2.x or later.
A USB Cable: A reliable data-sync USB cable (not a power-only cable).
Internet Connection: Required for downloading the board definitions and tools.
Part 1: Standard Installation Method
This is the recommended and easiest way to install the ESP32 core.
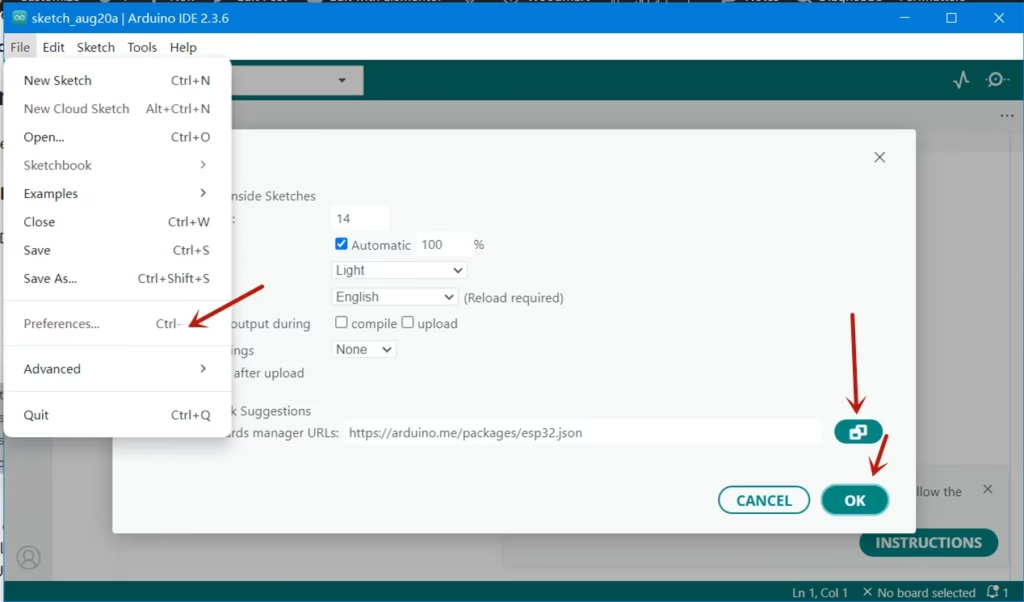
Step 1: Open the Preferences Window
Open the Arduino IDE. Go to File > Preferences (Windows/Linux) or Arduino IDE > Settings (macOS).
Step 2: Add the ESP32 Board Manager URL
In the “Additional boards manager URLs” field, paste the following URL:
If you already have other URLs in this field (e.g., for ESP8266), you can add this new one by clicking the button next to the field and adding it on a new line. Click OK to save.
What I used is the URL https://arduino.me/packages/esp32.json, It’s very good for Chinese engineers.
You can also download the offline softwareto install the ESP32 on Arduino IDE if there are problems to install it.
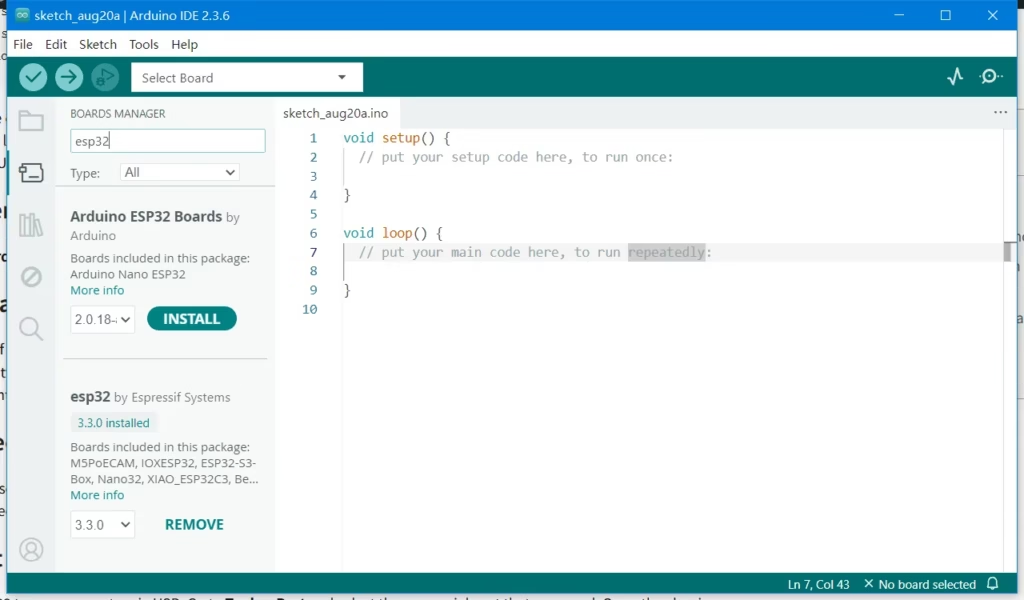
Step 3: Open the Boards Manager
Go to Tools > Board > Boards Manager….
Step 4: Install the ESP32 Package
In the search bar of the Boards Manager, type esp32. The result “ESP32 by Espressif Systems” should appear. Click on it and then click the Install button. The installation will take a few minutes as the IDE downloads the compiler tools, libraries, and definitions for all ESP32 variants.
Step 5: Select Your Board
Once installed, close the Boards Manager. Go to Tools > Board. You should now see a new section for “ESP32 Arduino”. Expand it and select your specific ESP32 board (e.g., “ESP32 Dev Module” is a common generic choice).
Step 6: Test with a Simple Blink Sketch
Connect your ESP32 to your computer via USB. Go to Tools > Port and select the new serial port that appeared. Open the classic Blink example: File > Examples > 01.Basics > Blink. Before uploading, change the LED pin to GPIO 2 (for most ESP32 boards):
const int ledPin = 2; // Change from 13 to 2
Click the Upload button. If successful, the code will compile and upload, and the LED on your ESP32 will start blinking.
Congratulations! If you’ve reached this point without issues, your ESP32 is successfully installed and ready to use!
Part 2: Troubleshooting Common Installation Problems
Problem 1: “Error downloading https://raw.githubusercontent.com/…” or Installation Hangs
This is the most common issue, often caused by network restrictions, firewalls, or GitHub’s CDN.
Then try installing again from the Boards Manager.
Problem 2: “A fatal error occurred: Failed to connect to ESP32: … No serial data received.”
This error happens after code upload, meaning the IDE can’t communicate with the chip to flash it.
Solutions:
Put the ESP32 into Download Mode: Hold down the BOOT button on your board, click Upload in the IDE, and then release the BOOT button once the “Connecting…” message appears.
Try a Different USB Cable and Port: Ensure it’s a data cable. Try a different USB port on your computer.
Problem 3: “Could not find a package index file for the board…”
This error means the IDE can’t read the JSON file from the URL you provided.
Solutions:
Check the URL for Typos: Ensure the URL in the preferences is 100% correct.
Check Your Internet Connection: A firewall or proxy might be blocking access to GitHub. Try accessing the URL directly in a web browser.
Problem 4: Python Not Found / Command Error During Compilation
The ESP32 build process relies on Python. Modern Arduino IDE versions usually include it, but sometimes conflicts occur.
Solutions:
Install Python Manually: Download and install Python 3.7 or newer from python.org. During installation, crucially, check the box that says “Add Python to PATH”.
Restart your computer after installation to ensure the new PATH variable is loaded.
Part 3: Verifying a Successful Installation
Once you’ve resolved any issues, follow these steps to confirm everything is working:
Select your ESP32 board and the correct COM port
Open the Blink example and change the LED pin to 2
Click Upload
The bottom of the IDE window should show “Leaving… Hard resetting via RTS pin…” and finally “Done uploading”
The onboard LED should start blinking steadily
Congratulations! You have successfully installed the ESP32 core on Arduino IDE 2025 and are ready to start your IoT projects. The platform offers a vast collection of examples and libraries to explore, from connecting to Wi-Fi to using Bluetooth and various sensors.
If you continue to experience issues after trying these solutions, consider asking for help on the ESP32 Forum or the Arduino Forum, where you can often get personalized assistance from the community.
Since 2016, ESP32S.com has grown to become a complete ecosystem partner for your IoT journey. Based in Shenzhen, a global hub for electronics innovation, we have helped hundreds of developers and businesses bring their ESP32-based ideas to life. Our team is dedicated to providing exceptional support and innovative solutions to help you achieve your IoT goals.
At ESP32S.com, we master the intricacies of developing an ESP32-based product, which involves multiple stages, from concept to market launch. That’s why we now offer comprehensive solutions covering the entire product lifecycle for ESP32-based devices. Whether you need help with PCB design, prototyping, production, or even marketing and fulfillment, we have you covered.
Ready to take your IoT project to the next level? Contact ESP32S.com today to learn more about our comprehensive solutions for ESP32-based devices. Let us be your trusted partner in bringing your innovative ideas to life. Contact us now to get started.
The global shift toward electric vehicles (EVs), grid-scale energy storage, and advanced Battery Management Systems (BMS) has fundamentally changed the