Want to create a professional-looking data dashboard on your ESP32 Cheap Yellow Display? In this project, you’ll learn how to build a responsive table using LVGL that displays real-time readings from a BME280 sensor (temperature, humidity, pressure) and the built-in LDR (light sensor). The table also shows the current date, time (from an internet API), and your board’s IP address—all updated with a single touch of a floating refresh button.
This project is perfect for creating environmental monitoring stations, weather dashboards, or any IoT application where you need to present multiple sensor values in a clean, organized format.
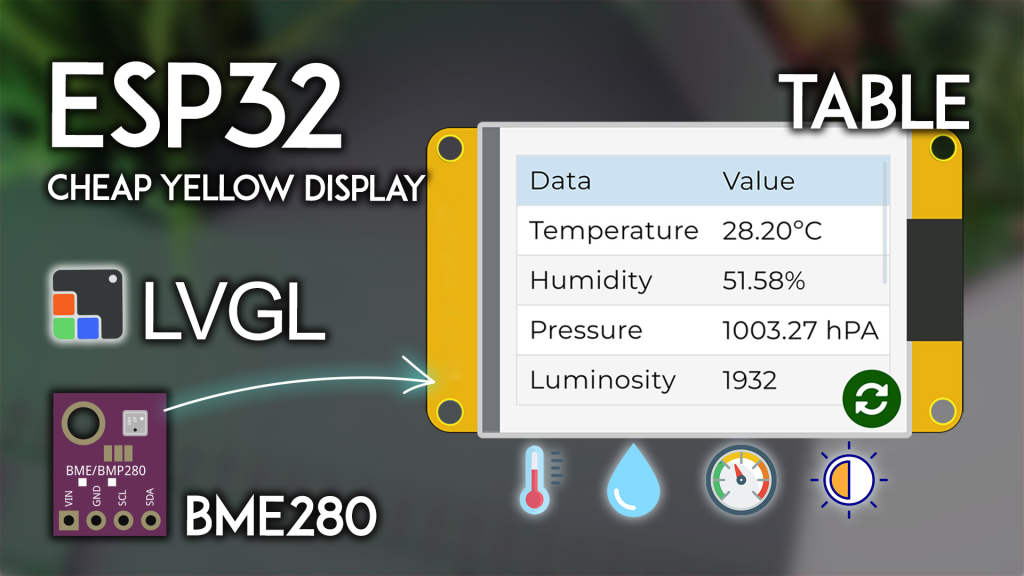
Project Overview: What You’ll Build
This project combines several powerful features into one cohesive dashboard:
-
LVGL data table: Displays sensor readings in a clean two-column format
-
Multiple sensors: BME280 (temperature, humidity, pressure) + CYD’s built-in LDR
-
Internet time: Fetches accurate date/time from WorldTimeAPI (Wi-Fi required)
-
IP address display: Shows the ESP32‘s local network address
-
Touch refresh: A floating button updates all values instantly
-
Auto-scaling: Temperature displayed in °C or °F (configurable)
Note: This project requires an internet connection to fetch the current date and time. If Wi-Fi isn’t available, you can omit the time feature or add an RTC module.
What You’ll Need: Complete Parts List
👉 Find all components at the best prices here
Wiring the BME280 to CYD
The CYD board includes a CN1 connector (JST) that provides access to additional GPIOs. Connect your BME280 sensor as follows:
Built-in LDR: The CYD already has a light-dependent resistor connected to GPIO 34—no external wiring needed.
Prerequisites: Setting Up Your Environment
Complete these essential setup steps in order:
1. ESP32 Board Support
If not already done, install ESP32 boards in Arduino IDE: Installing ESP32 Board in Arduino IDE.
2. Get Familiar with the CYD
First-time CYD user? Complete our Getting Started with ESP32 CYD guide. You’ll need to:
3. Install LVGL for CYD
This project uses LVGL 9.x for the table interface. Follow our dedicated tutorial:
👉 LVGL with ESP32 Cheap Yellow Display
⚠️ CRITICAL: You must use the exact lv_conf.h file from that tutorial. Other configurations will not work.
4. Install Required Libraries
Install these libraries via Arduino Library Manager (Sketch > Include Library > Manage Libraries):
5. (Optional) Touchscreen Calibration
For the most accurate touch interaction with the refresh button, we recommend calibrating your touchscreen. Follow our ESP32 CYD Touchscreen Calibration Guide to get your specific calibration coefficients.
Complete Code: Sensor Data Table on CYD
Copy the following code into your Arduino IDE. You must modify two sections before uploading:
-
Wi-Fi credentials: Replace with your network SSID and password
-
Timezone: Set your timezone (e.g., “America/New_York”, “Europe/London”)
-
(Optional) Touch calibration: Replace placeholder values with your own
ESP32 CYD with LVGL - BME280 Sensor Data Table
Displays temperature, humidity, pressure, LDR, date, time, and IP
Complete tutorial: https://RandomNerdTutorials.com/esp32-cyd-lvgl-display-bme280-data-table/
*********/
#include <lvgl.h>
#include <TFT_eSPI.h>
#include <XPT2046_Touchscreen.h>
#include <WiFi.h>
#include <HTTPClient.h>
#include <ArduinoJson.h>
#include <Wire.h>
#include <Adafruit_Sensor.h>
#include <Adafruit_BME280.h>
const char* ssid = "YOUR_WIFI_SSID";
const char* password = "YOUR_WIFI_PASSWORD";
const char* timezone = "Europe/Lisbon";
#define I2C_SDA 27
#define I2C_SCL 22
#define SEALEVELPRESSURE_HPA (1013.25)
TwoWire I2CBME = TwoWire(0);
Adafruit_BME280 bme;
#define TEMP_CELSIUS 1
#define LDR_PIN 34
#define XPT2046_IRQ 36
#define XPT2046_MOSI 32
#define XPT2046_MISO 39
#define XPT2046_CLK 25
#define XPT2046_CS 33
SPIClass touchscreenSPI = SPIClass(VSPI);
XPT2046_Touchscreen touchscreen(XPT2046_CS, XPT2046_IRQ);
#define SCREEN_WIDTH 240
#define SCREEN_HEIGHT 320
int touchX, touchY, touchZ;
#define DRAW_BUF_SIZE (SCREEN_WIDTH * SCREEN_HEIGHT / 10 * (LV_COLOR_DEPTH / 8))
uint32_t draw_buf[DRAW_BUF_SIZE / 4];
String current_date;
String current_time;
static lv_obj_t * table;
static lv_obj_t * refresh_btn;
void get_date_and_time();
void update_table_values();
void log_print(lv_log_level_t level, const char * buf) {
LV_UNUSED(level);
Serial.println(buf);
Serial.flush();
}
void touchscreen_read(lv_indev_t * indev, lv_indev_data_t * data) {
if(touchscreen.tirqTouched() && touchscreen.touched()) {
TS_Point p = touchscreen.getPoint();
float alpha_x = -0.000;
float beta_x = 0.090;
float delta_x = -33.771;
float alpha_y = 0.066;
float beta_y = 0.000;
float delta_y = -14.632;
touchX = alpha_y * p.x + beta_y * p.y + delta_y;
touchX = constrain(touchX, 0, SCREEN_WIDTH - 1);
touchY = alpha_x * p.x + beta_x * p.y + delta_x;
touchY = constrain(touchY, 0, SCREEN_HEIGHT - 1);
touchZ = p.z;
data->state = LV_INDEV_STATE_PRESSED;
data->point.x = touchX;
data->point.y = touchY;
} else {
data->state = LV_INDEV_STATE_RELEASED;
}
}
void get_date_and_time() {
HTTPClient http;
String url = String("http://worldtimeapi.org/api/timezone/") + timezone;
http.begin(url);
int httpCode = http.GET();
if (httpCode == HTTP_CODE_OK) {
String payload = http.getString();
JsonDocument doc;
DeserializationError error = deserializeJson(doc, payload);
if (!error) {
const char* datetime = doc["datetime"];
if (datetime) {
String dt = String(datetime);
current_date = dt.substring(0, 10);
current_time = dt.substring(11, 19);
}
}
}
http.end();
}
static void float_button_event_cb(lv_event_t * e) {
update_table_values();
}
static void update_table_values(void) {
float temp = bme.readTemperature();
float hum = bme.readHumidity();
float pres = bme.readPressure() / 100.0F;
#if TEMP_CELSIUS
String temp_str = String(temp) + " °C";
#else
temp = temp * 1.8 + 32;
String temp_str = String(temp) + " °F";
#endif
String hum_str = String(hum) + " %";
String pres_str = String(pres) + " hPa";
String ldr_str = String(analogRead(LDR_PIN));
get_date_and_time();
lv_table_set_cell_value(table, 0, 0, "Data");
lv_table_set_cell_value(table, 1, 0, "Temperature");
lv_table_set_cell_value(table, 2, 0, "Humidity");
lv_table_set_cell_value(table, 3, 0, "Pressure");
lv_table_set_cell_value(table, 4, 0, "Luminosity");
lv_table_set_cell_value(table, 5, 0, "Date");
lv_table_set_cell_value(table, 6, 0, "Time");
lv_table_set_cell_value(table, 7, 0, "IP Address");
lv_table_set_cell_value(table, 0, 1, "Value");
lv_table_set_cell_value(table, 1, 1, temp_str.c_str());
lv_table_set_cell_value(table, 2, 1, hum_str.c_str());
lv_table_set_cell_value(table, 3, 1, pres_str.c_str());
lv_table_set_cell_value(table, 4, 1, ldr_str.c_str());
lv_table_set_cell_value(table, 5, 1, current_date.c_str());
lv_table_set_cell_value(table, 6, 1, current_time.c_str());
lv_table_set_cell_value(table, 7, 1, WiFi.localIP().toString().c_str());
}
static void draw_event_cb(lv_event_t * e) {
lv_draw_task_t * draw_task = lv_event_get_draw_task(e);
lv_draw_dsc_base_t * base_dsc = (lv_draw_dsc_base_t*) draw_task->draw_dsc;
if(base_dsc->part == LV_PART_ITEMS) {
uint32_t row = base_dsc->id1;
uint32_t col = base_dsc->id2;
if(row == 0) {
lv_draw_label_dsc_t * label_draw_dsc = lv_draw_task_get_label_dsc(draw_task);
if(label_draw_dsc) {
label_draw_dsc->align = LV_TEXT_ALIGN_CENTER;
}
}
}
}
void create_ui() {
table = lv_table_create(lv_screen_active());
lv_obj_set_size(table, 280, 200);
lv_obj_align(table, LV_ALIGN_CENTER, 0, -10);
lv_table_set_column_width(table, 0, 120);
lv_table_set_column_width(table, 1, 120);
lv_obj_add_event_cb(table, draw_event_cb, LV_EVENT_DRAW_TASK_ADDED, NULL);
refresh_btn = lv_btn_create(lv_screen_active());
lv_obj_set_size(refresh_btn, 50, 50);
lv_obj_align(refresh_btn, LV_ALIGN_BOTTOM_RIGHT, -10, -10);
lv_obj_add_event_cb(refresh_btn, float_button_event_cb, LV_EVENT_CLICKED, NULL);
lv_obj_t * btn_label = lv_label_create(refresh_btn);
lv_label_set_text(btn_label, LV_SYMBOL_REFRESH);
lv_obj_center(btn_label);
update_table_values();
}
void initBME() {
I2CBME.begin(I2C_SDA, I2C_SCL, 100000);
if (!bme.begin(0x76, &I2CBME)) {
Serial.println("BME280 not found! Check wiring.");
while (1);
}
Serial.println("BME280 initialized.");
}
void connectWiFi() {
Serial.print("Connecting to Wi-Fi");
WiFi.begin(ssid, password);
while (WiFi.status() != WL_CONNECTED) {
delay(500);
Serial.print(".");
}
Serial.println("\nWiFi connected. IP: " + WiFi.localIP().toString());
}
void setup() {
Serial.begin(115200);
Serial.println("ESP32 CYD Sensor Data Table Starting...");
connectWiFi();
initBME();
touchscreenSPI.begin(XPT2046_CLK, XPT2046_MISO, XPT2046_MOSI, XPT2046_CS);
touchscreen.begin(touchscreenSPI);
touchscreen.setRotation(1);
lv_init();
lv_log_register_print_cb(log_print);
lv_display_t * disp = lv_tft_espi_create(SCREEN_WIDTH, SCREEN_HEIGHT,
draw_buf, sizeof(draw_buf));
lv_display_set_rotation(disp, LV_DISPLAY_ROTATION_270);
lv_indev_t * indev = lv_indev_create();
lv_indev_set_type(indev, LV_INDEV_TYPE_POINTER);
lv_indev_set_read_cb(indev, touchscreen_read);
create_ui();
Serial.println("Ready. Table updates on refresh button press.");
}
void loop() {
lv_task_handler();
lv_tick_inc(5);
delay(5);
}
How the Code Works
1. Wi-Fi and Time Fetching
The ESP32 connects to your Wi-Fi network and queries the WorldTimeAPI for the current date/time in your specified timezone. The API returns a JSON string, which we parse using ArduinoJson to extract the date and time.
2. Sensor Reading
-
BME280: Reads temperature, humidity, and pressure via I2C
-
LDR: Reads the built-in light sensor on GPIO 34 (analog value 0-4095)
3. LVGL Table
The table is created with lv_table_create() and has two columns:
-
Column 0: Labels (Data, Temperature, Humidity, etc.)
-
Column 1: Current values (updated on refresh)
4. Touch Refresh Button
A floating button with a refresh icon (LV_SYMBOL_REFRESH) calls update_table_values() when clicked, fetching fresh sensor readings and time.
5. Cell Styling
The draw_event_cb() function centers the text in the header row (row 0) for a cleaner look.
Testing Your Sensor Data Table
-
Replace your Wi-Fi credentials and timezone in the configuration section
-
Upload the code to your ESP32 CYD
-
Open Serial Monitor (115200 baud) to see connection status
-
Observe the display—after connecting to Wi-Fi, the table should populate with:
-
Temperature, humidity, pressure from BME280
-
Luminosity value from built-in sensor
-
Current date and time (from API)
-
Your ESP32’s IP address
-
Tap the refresh button (bottom right) to update all values
Troubleshooting
Taking It Further: Project Enhancements
This foundation opens many possibilities:
Add Data Logging to SD Card
The CYD has a microSD slot. Log all readings with timestamps for later analysis.
Create Historical Trends
Use LVGL charts to show temperature or humidity over time (see our line chart tutorial).
Add More Sensors
Connect additional I2C sensors (e.g., air quality, CO2) and add rows to the table.
Make It Battery Powered
Power from a USB power bank for portable environmental monitoring.
Send Data to the Cloud
Forward readings to MQTT, Blynk, or a web server for remote monitoring.
Where to Buy Components
Ready to build your own sensor data dashboard?
👉 Check all components and best prices here
Conclusion
You’ve just built a professional-grade sensor data dashboard on the ESP32 Cheap Yellow Display using LVGL. This project demonstrates:
-
Tabular data presentation with LVGL’s table widget
-
Multiple sensor integration (BME280 + built-in LDR)
-
Internet time fetching via WorldTimeAPI
-
Touch-based refresh for user interaction
-
Clean, organized display of environmental data
This same pattern can display any kind of structured data—from weather stations to industrial monitoring systems. The ESP32 CYD and LVGL make it surprisingly easy to create polished, interactive dashboards.
Get your components today and start building your own data display!
Contact Us
